want to listen to the recipe ?
Who can resist the great pleasure of eating crispy, juicy fried chicken? Not me! I love the satisfying crunch and the flavorful, juicy meat of a perfectly fried chicken cutlet. Today, I’m excited to show you how to make Chicken Katsu (チキンカツ), the Japanese version of chicken schnitzel or chicken tenders, right in your kitchen. This dish is surprisingly easy to make, even on a busy weeknight, and it’s a great option for meal prep. In this post, I’ll walk you through the steps to achieve the crispiest results, offer serving ideas, and provide helpful tips to make this dish a success.
What is Chicken Katsu?
Chicken katsu (チキンカツ) is a Japanese dish made with chicken breast fillets. These fillets are breaded with flour, egg, and Japanese panko breadcrumbs, then deep-fried until golden brown. It is the chicken version of Tonkatsu, which uses pork. The term “katsu” is actually a shortened form of “katsuretsu,” which means “cutlet” in Japanese. This dish is a popular home-cooked meal in Japan, and you can find different versions depending on the type of meat you use.
Ingredients for Chicken Katsu
Here’s what you’ll need to make delicious Chicken Katsu:
- Chicken:
- Boneless, skinless chicken breast is the most popular choice. You can also use chicken thighs or tenders. I recommend pounding the chicken to an even thickness for best results.
- Seasoning:
- Salt
- Pepper
- Breading:
- All-purpose flour
- Eggs
- Panko (Japanese breadcrumbs): Panko is lighter and crispier than regular breadcrumbs. A Japanese brand will give you the best results.
- Oil:
- Neutral oil for deep frying (like vegetable or canola)
- For Serving:
- Tonkatsu sauce (or katsu sauce). This is a sweet and tangy sauce.
- Shredded green cabbage
- Optional: Japanese sesame dressing and tomato
[woo_product_slider id=”3030″]
How to Make the Best Chicken Katsu: A Step-by-Step Guide
Follow these steps to make perfect Chicken Katsu:
Preparation
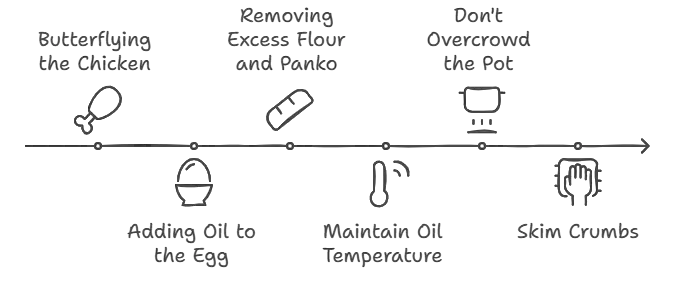
- Butterfly the chicken: Use the Kannon biraki technique to butterfly the chicken. This means splitting it horizontally from the side and opening it like a book.
- Pound the chicken: Use a meat mallet or the back of a knife to pound the chicken to an even thickness of about ¼ to ½ inch.
- Season the chicken: Season both sides of the chicken with salt and pepper.
Breading
- Set up a breading station: Prepare three shallow dishes. One for flour, one for the egg mixed with a bit of oil, and one for panko.
- The right order: First, coat the chicken with flour. Then, dip it in the egg mixture. Finally, coat it with panko.
- Add oil to the egg: Adding a bit of oil to the egg mixture helps the breading stick better.
- Coat the chicken: Make sure the chicken is fully coated with flour, then egg, then panko, gently pressing so the panko adheres well.
- Remove excess: Remove any excess flour and panko.
Deep Frying
- Choose the right pot: Use a medium-sized, heavy-bottomed pot.
- Heat the oil: Heat the oil to the correct temperature of 340ºF (170ºC) using a thermometer.
- Fry in batches: Fry the chicken in batches to avoid overcrowding.
- Maintain oil temperature: Keep the oil temperature at 340ºF.
- Cooking time: Deep fry for a total of 3 minutes, turning halfway through.
- Remove excess oil: Hold the cutlet vertically over the pot for a few seconds to let excess oil drip off.
- Skim crumbs: Skim off crumbs from the oil to prevent burning.
Serving
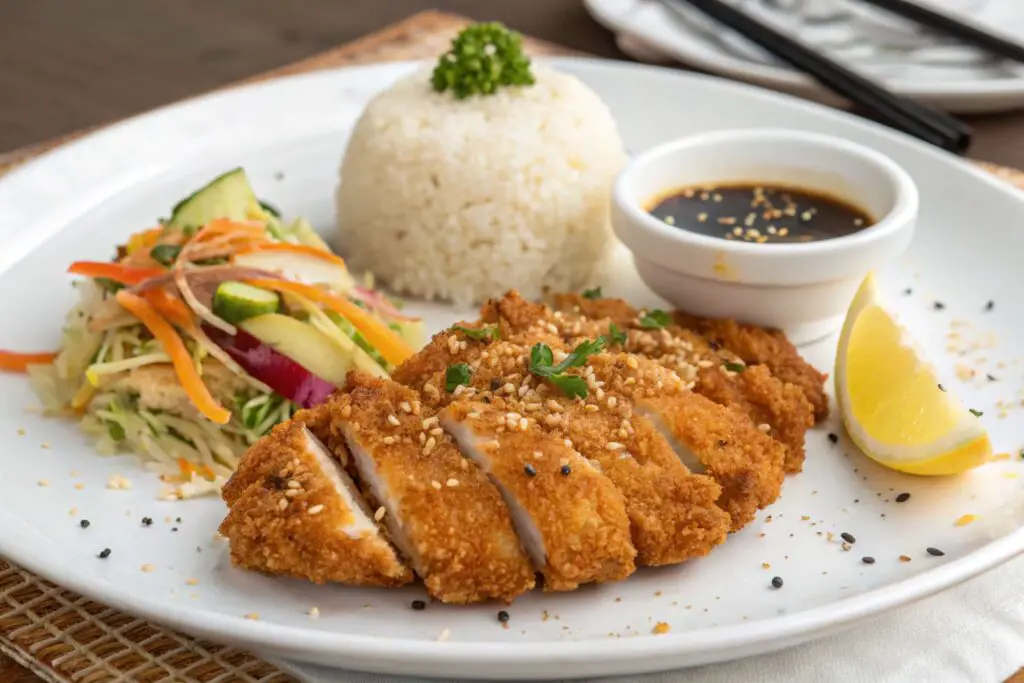
- Cut the chicken: Cut into 1-inch pieces before serving.
- Serve with tonkatsu sauce: Always serve the chicken katsu with tonkatsu sauce.
- Serve with shredded cabbage: Shredded cabbage is a traditional side.
- Add Japanese sesame dressing to the cabbage. You can also include tomato wedges.
Cooking Tips for Perfect Chicken Katsu
Here are some tips to help you achieve the best results:
- Tip #1: Butterflying the Chicken: The Kannon Biraki technique helps the chicken cook evenly. Make sure you slice from the side and not all the way through.
- Tip #2: Adding Oil to the Egg: The oil in the egg mixture acts as a binder that helps the breading adhere better.
- Tip #3: Removing Excess Flour and Panko: Excess flour can cause the breading to come off easily. Too much panko can burn in the oil.
- Tip #4: Maintain Oil Temperature: Use a thermometer to keep the oil at 340ºF. This is crucial for crispy results.
- Tip #5: Don’t overcrowd the pot: Adding too much food at once will drop the oil temperature and the chicken will absorb too much oil.
- Tip #6: Skim crumbs: Removing crumbs keeps the oil clean and prevents burning.
Deep Frying Tips
- Pot size: Use a medium-size pot with at least 1 to 1½ inches of oil.
- Oil temperature: Maintain the oil temperature at 340ºF (170ºC).
- Thermometer: Use a kitchen thermometer for the most accurate results.
- Clean oil: Pick up crumbs frequently to keep the oil clean.
For more tips on deep-frying, check out this helpful guide.
How to Serve Chicken Katsu
- Tonkatsu Sauce: Tonkatsu sauce is a sweet, thick Japanese sauce that is best for deep-fried dishes. Many people buy it from the store, and Bulldog is a popular brand. You can also make your own.
- Shredded Cabbage: Thinly shredded cabbage is an essential side dish. Use a mandoline slicer for best results.
- Other Sides: Serve with rice, Japanese sesame dressing and tomato.
- Serving variations: You could also add Japanese-style coleslaw, kombu seaweed salad, or miso soup.
Meal Prep and Storage
Chicken katsu is perfect for meal prep. You can use it in other dishes:
- Chicken Katsu Curry
- Katsudon
- Chicken Katsu Sando Sandwich
- Chicken Katsu Onigirazu
- Chicken Katsu Fried Rice
- Bento boxes
Freezing: Let the fried chicken cool completely, then store in an airtight container with parchment paper between pieces.
Reheating: Reheat frozen chicken katsu on a baking sheet in a 350ºF (180ºC) oven for 15–20 minutes if thawed, or 30 minutes if heating from frozen. Do not use the microwave, as it will make the chicken soggy.
Storage: Chicken katsu will stay fresh in the refrigerator for 2-3 days. Reheat in the oven or toaster oven to restore crispiness.
Make Ahead: You can also prepare the chicken ahead of time and keep it refrigerated for up to 4 hours before frying.
Variations and Substitutions
- Chicken Options: Chicken thighs or tenders are great alternatives to chicken breasts.
- Pork Katsu (Tonkatsu): You can use this recipe to make tonkatsu by substituting pork cutlets.
- Gluten-Free Options: Use gluten-free flour and gluten-free panko breadcrumbs.
- Other Options: You can shallow fry if you don’t want to deep fry.
Health and Nutrition
One serving of Chicken Katsu has about 474 calories, 21 g of carbohydrates, 19 g of protein, and 35 g of fat. The nutritional value can vary based on preparation methods and ingredients. Enjoy it as part of a balanced meal with plenty of vegetables and a moderate portion of rice.
Expert Tips and Additional Advice
- Adding oil to the egg helps the breading stick better.
- The order of breading, flour, then egg, then panko, is important for a crispy coating.
- Maintaining the oil temperature at 340ºF (170ºC) ensures the chicken is cooked properly and the breading is golden brown.
Conclusion
Making Chicken Katsu at home is easier than you think! With a few simple steps and the right techniques, you can achieve crispy, juicy chicken cutlets that everyone will love. Try this recipe and enjoy the wonderful flavors of Japan in your own kitchen. Share your own tips and experiences in the comments below!
Recipe Card
Yields: 4 servings
Prep time: 20 minutes
Cook time: 10 minutes
Ingredients
- 1 boneless, skinless chicken breast (9.5 oz, 270 g) or use the same weight of chicken thighs or tenders
- ½ tsp kosher salt
- ⅛ tsp black pepper
- 3 Tbsp all-purpose flour
- 1 large egg (50 g)
- ½ Tbsp neutral oil for the egg
- 1 cup panko (Japanese breadcrumbs)
- 3 cups neutral oil for deep-frying
- Tonkatsu sauce
- Shredded green cabbage
- Optional: Japanese Sesame Dressing and tomato
Instructions
- Butterfly the chicken breast by slicing horizontally and opening it like a book. Use the Kannon biraki technique to make it even.
- Pound the chicken to an even thickness, about ¼ to ½ inch.
- Season both sides with salt and pepper.
- Set up three shallow dishes: one with flour, one with egg mixed with oil, and one with panko.
- Coat each piece of chicken in flour, shaking off any excess.
- Dip the floured chicken in the egg mixture.
- Press the chicken into the panko breadcrumbs, making sure to coat well.
- Heat the oil in a medium-size pot to 340ºF (170ºC).
- Fry chicken in batches for about 3 minutes, turning halfway, until golden brown.
- Remove from oil and hold vertically for a few seconds to drain excess oil.
- Place on a wire rack or paper towel-lined tray.
- Cut into 1-inch pieces.
- Serve with tonkatsu sauce and a side of shredded green cabbage. Add Japanese sesame dressing and tomato, if desired.
Serving Options
- Serve with tonkatsu sauce, shredded cabbage, and rice.
- Add a side of miso soup, Japanese-style coleslaw or a Japanese salad
- Use in Chicken Katsu Curry, Katsudon, or a sandwich.
Ingredient Substitutions
- Use chicken thighs or tenders instead of chicken breast.
- Substitute pork cutlets to make tonkatsu.
- Use gluten-free flour and panko for a gluten-free option.
- Shallow fry instead of deep frying.
This blog post provides a comprehensive guide to making Chicken Katsu, with a focus on clarity, simplicity, and engagement. The information provided is directly supported by the sources, and the conversational tone makes it accessible and enjoyable for a wide audience.